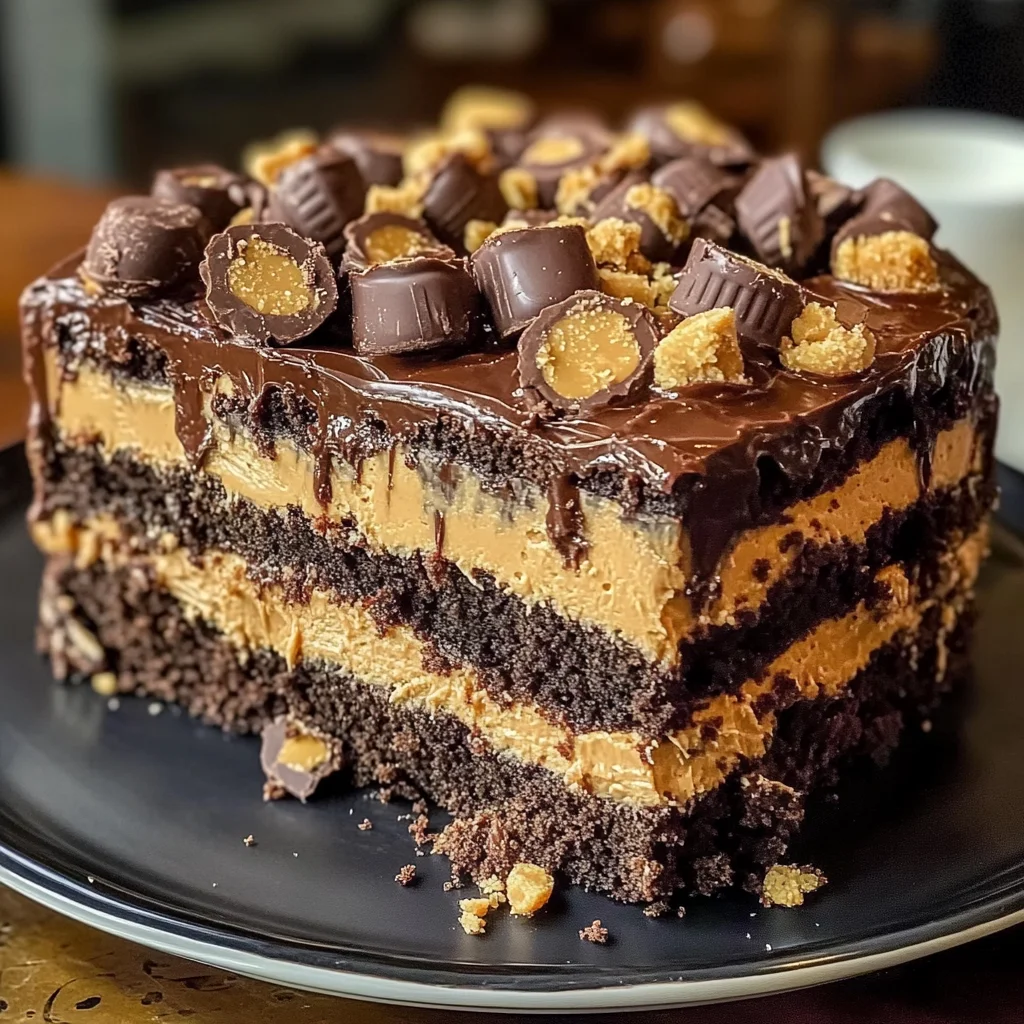
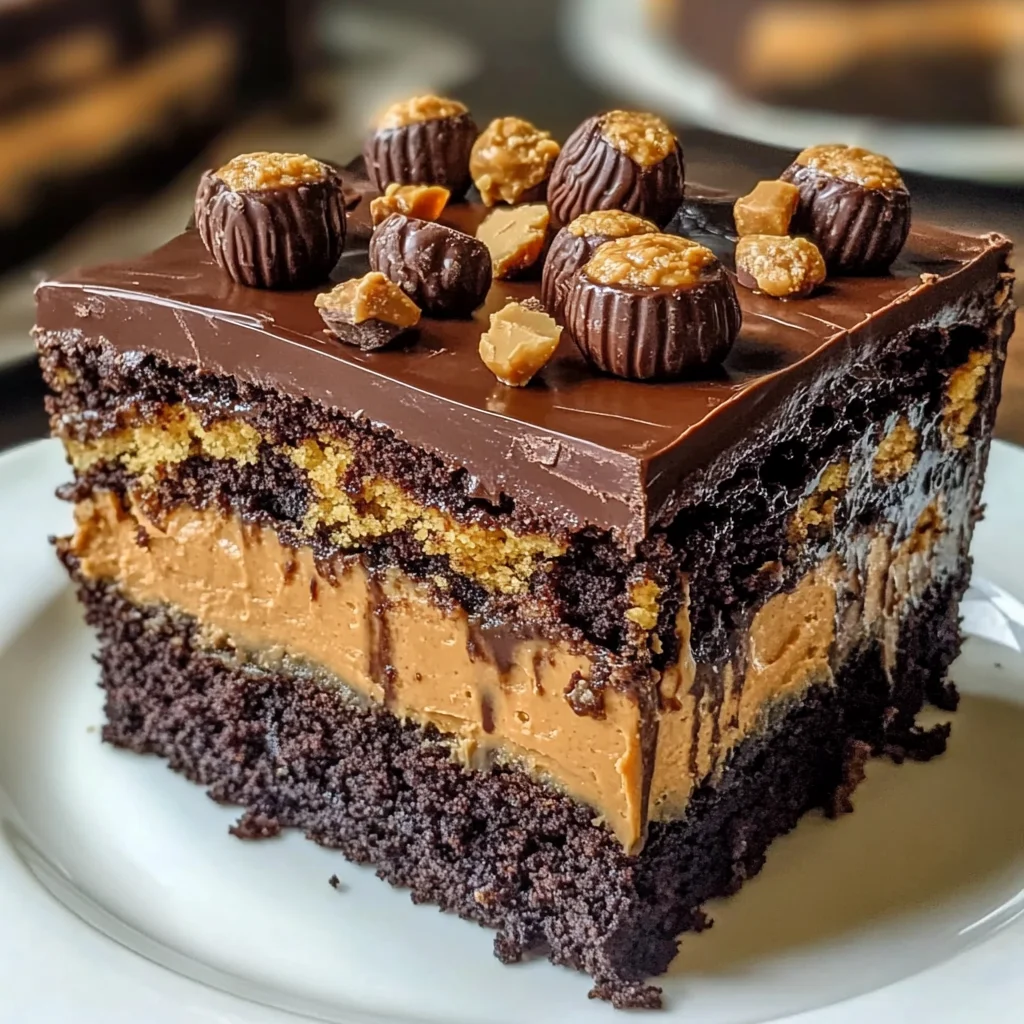
Reese’s Peanut Butter Earthquake Cake
If you’re looking for a dessert that combines rich chocolate and creamy peanut butter, then let me introduce you to my favorite indulgence: Reese’s Peanut Butter Earthquake Cake. This cake is not just a treat; it’s an experience! Picture this: a moist, chocolatey cake with a gooey, peanut butter center that oozes deliciousness with every bite. It’s perfect for busy weeknights when you need a quick fix for a sweet craving or for family gatherings that call for something truly special.
What makes this cake stand out is its delightful combination of textures and flavors. The crunchy bits of Reese’s Peanut Butter Cups on top add just the right amount of sweetness to the rich cake beneath. You’ll find yourself coming back for seconds (and maybe thirds!). Trust me, once you try it, you’ll understand why this recipe is so loved.
Why You’ll Love This Recipe
- Easy to make: With just a few simple steps, you can whip up this showstopper in no time!
- Family-friendly: Everyone loves chocolate and peanut butter—this cake is sure to be a hit with kids and adults alike.
- Gooey goodness: The layered peanut butter center creates a wonderful surprise in every slice.
- Make-ahead friendly: Bake it in advance for parties or gatherings; it tastes amazing warm or at room temperature.
Ingredients You’ll Need
Let’s talk about the ingredients! This Reese’s Peanut Butter Earthquake Cake uses simple, wholesome ingredients that are easy to find. Gather these staples from your pantry and fridge, and you’re all set to create something truly delicious.
For the Cake
- 1 box chocolate cake mix
- 1 cup water
- 1/2 cup vegetable oil
- 3 large eggs
For the Peanut Butter Layer
- 1 cup creamy peanut butter
- 8 oz cream cheese, softened
- 1/2 cup unsalted butter, melted
- 4 cups powdered sugar
- 1 tsp vanilla extract
Topping
- 1 cup Reese’s Peanut Butter Cups, chopped
Variations
This recipe is wonderfully flexible! Here are some fun ways to switch things up:
- Add nuts: Toss in some chopped peanuts for an extra crunch.
- Use different chocolates: Swap the chocolate cake mix for vanilla or red velvet for a different flavor twist.
- Go gluten-free: Use a gluten-free chocolate cake mix to cater to those with dietary restrictions.
- Add toppings: Drizzle with melted chocolate or caramel sauce before serving for an extra layer of indulgence.
How to Make Reese’s Peanut Butter Earthquake Cake
Step 1: Preheat the Oven
First things first—preheat your oven to 350°F (175°C) and grease a 9×13-inch baking dish. Preheating ensures that your cake bakes evenly and rises perfectly!
Step 2: Mix the Cake Batter
In a large bowl, combine the chocolate cake mix with water, vegetable oil, and eggs. Mix until everything is well combined. This step is vital because it sets the base for our deliciously rich cake!
Step 3: Prepare the Peanut Butter Mixture
In another bowl, blend together the creamy peanut butter, softened cream cheese, melted butter, powdered sugar, and vanilla extract until smooth. This mixture will create that decadent layer we love!
Step 4: Combine Layers
Drop spoonfuls of the peanut butter mixture over the top of your chocolate batter. Use a knife to gently swirl it into the batter—it doesn’t have to be perfect! Just make sure there are nice swirls throughout.
Step 5: Add Toppings
Sprinkle the chopped Reese’s Peanut Butter Cups evenly over the top of your creation. These little pieces will melt slightly during baking and create an irresistible topping!
Step 6: Bake
Place your baking dish in the oven and bake for about 35-40 minutes. Keep an eye on it; when a toothpick inserted into the center comes out mostly clean, it’s done!
Step 7: Cool and Serve
Allow your cake to cool slightly before digging in. It’s fantastic warm but equally delightful at room temperature. Enjoy each bite of this Reese’s Peanut Butter Earthquake Cake!
With this recipe in hand, you’re ready to impress friends and family with a dessert that’s as fun as it is delicious!
Pro Tips for Making Reese’s Peanut Butter Earthquake Cake
Making the perfect Reese’s Peanut Butter Earthquake Cake is all about the little details that can elevate your dessert game. Here are some handy tips to ensure your cake turns out delightful every time!
-
Use room temperature ingredients – Allowing your eggs and cream cheese to come to room temperature helps them blend seamlessly into the batter, leading to a smoother texture in your cake.
-
Don’t overmix the batter – Mixing just until combined prevents the cake from becoming tough. A light hand will keep it airy and delicious, allowing that gooey center to shine through.
-
Swirl gently – When incorporating the peanut butter mixture, take care not to over-swirl. A few gentle swirls create beautiful marbling while still allowing for those delicious pockets of peanut butter goodness.
-
Let it cool slightly before serving – Giving your cake a short cooling period allows the flavors to meld nicely and makes it easier to cut without falling apart, ensuring a beautiful presentation.
How to Serve Reese’s Peanut Butter Earthquake Cake
This indulgent dessert deserves some thoughtful presentation! Here are some ideas on how to serve this heavenly cake that will impress your friends and family alike.
Garnishes
-
Whipped Non-Dairy Cream – A dollop of whipped non-dairy cream adds a light, fluffy contrast to the rich cake, enhancing its creamy texture even further.
-
Drizzle of Chocolate Sauce – A simple drizzle of chocolate sauce over each slice brings an extra layer of decadence and ties in beautifully with the chocolate cake base.
Side Dishes
-
Vanilla Ice Cream – The classic pairing! A scoop of vanilla ice cream alongside warm cake creates a delightful contrast between temperatures and flavors, making each bite more enjoyable.
-
Fresh Berries – Strawberries or raspberries add a refreshing tartness that balances out the sweetness of the cake perfectly. Their vibrant color also makes for an appealing plate!
-
Chocolate-Covered Pretzels – These salty-sweet treats complement the rich flavors of your earthquake cake while adding a delightful crunch that contrasts with its soft texture.
With these tips and serving suggestions, your Reese’s Peanut Butter Earthquake Cake will be not only a treat for the taste buds but also a feast for the eyes! Enjoy every delicious bite!
Make Ahead and Storage
This Reese’s Peanut Butter Earthquake Cake is not only a crowd-pleaser but also perfect for meal prep! You can easily make it in advance, ensuring you have a delightful dessert ready at any moment.
Storing Leftovers
- Store leftover cake in an airtight container at room temperature for up to 3 days.
- If you prefer, refrigerate the cake for up to a week. Just let it come to room temperature before serving.
Freezing
- To freeze, cut the cake into individual portions and wrap each piece tightly in plastic wrap.
- Place the wrapped pieces in a freezer-safe bag or container. They’ll keep well for up to 3 months.
Reheating
- To reheat, simply place a slice in the microwave for about 15-20 seconds or until warm.
- For a more decadent experience, serve it warm with a scoop of your favorite non-dairy ice cream!
FAQs
Got questions about making this delicious dessert? Here are some answers to help guide you!
What is Reese’s Peanut Butter Earthquake Cake?
Reese’s Peanut Butter Earthquake Cake is a rich chocolate cake layered with creamy peanut butter and topped with chopped Reese’s cups. It’s an indulgent treat perfect for any occasion!
Can I make Reese’s Peanut Butter Earthquake Cake ahead of time?
Absolutely! This cake stores well, making it ideal for meal prep. You can bake it in advance and enjoy it fresh or reheated later.
What if I don’t have peanut butter?
You can substitute peanut butter with other nut butters like almond or cashew butter, or use sunflower seed butter for a nut-free option while keeping that creamy texture!
How do I know when the Reese’s Peanut Butter Earthquake Cake is done baking?
The cake is done when a toothpick inserted into the center comes out mostly clean. Remember that the gooey center is part of its charm!
Final Thoughts
I hope you feel inspired to whip up this Reese’s Peanut Butter Earthquake Cake! It truly is a special dessert that brings warmth and joy to any gathering. Enjoy every bite, share it with loved ones, and don’t forget to savor the deliciousness you’ve created. Happy baking!
Reese’s Peanut Butter Earthquake Cake

Indulge in the delightful experience of Reese’s Peanut Butter Earthquake Cake, a mouthwatering dessert that beautifully combines rich chocolate and creamy peanut butter. This cake is perfect for any occasion, whether you need a quick treat during the week or something special for family gatherings. Imagine a moist chocolate cake filled with a gooey peanut butter center, topped with crunchy bits of Reese’s Peanut Butter Cups that melt slightly during baking. Each bite promises an explosion of flavors and textures, making it a favorite among chocolate and peanut butter lovers alike.
- Prep Time: 15 minutes
- Cook Time: 40 minutes
- Total Time: 55 minutes
- Yield: Serves approximately 12 people 1x
- Category: Dessert
- Method: Baking
- Cuisine: American
Ingredients
- 1 box chocolate cake mix
- 1 cup water
- 1/2 cup vegetable oil
- 3 large eggs
- 1 cup creamy peanut butter
- 8 oz cream cheese, softened
- 1/2 cup unsalted butter, melted
- 4 cups powdered sugar
- 1 tsp vanilla extract
- 1 cup Reese’s Peanut Butter Cups, chopped
Instructions
- Preheat your oven to 350°F (175°C) and grease a 9×13-inch baking dish.
- In a large bowl, combine the chocolate cake mix, water, vegetable oil, and eggs. Mix until well combined.
- In another bowl, blend together the creamy peanut butter, softened cream cheese, melted butter, powdered sugar, and vanilla extract until smooth.
- Drop spoonfuls of the peanut butter mixture over the chocolate batter and swirl gently with a knife.
- Sprinkle chopped Reese’s Peanut Butter Cups on top.
- Bake for 35-40 minutes or until a toothpick inserted in the center comes out mostly clean.
- Let cool slightly before serving.
Nutrition
- Serving Size: 1 slice (100g)
- Calories: 400
- Sugar: 35g
- Sodium: 350mg
- Fat: 23g
- Saturated Fat: 10g
- Unsaturated Fat: 11g
- Trans Fat: 0g
- Carbohydrates: 43g
- Fiber: 2g
- Protein: 6g
- Cholesterol: 50mg