Make Tasty Homemade Reese’s Cups in 5 Simple Steps Today!
If you’re looking for a sweet treat that feels like a hug in dessert form, you’ve come to the right place! There’s something truly special about biting into a rich, creamy homemade Reese’s Cup. This delightful recipe is not only simple but also perfect for any occasion—be it a busy weeknight craving or a fun family gathering. Trust me, once you learn how to make tasty homemade Reese’s Cups in 5 simple steps today, you’ll never want to go back to store-bought!
These little cups are always a hit with kids and adults alike. They’re quick to whip up and can be made ahead of time for your next get-together. Plus, who can resist that luscious combination of chocolate and peanut butter? Let’s dive into why this recipe will become a favorite in your household!
Why You’ll Love This Recipe
- Super easy to make: With just five simple steps, you can create these delicious treats without any fuss.
- Family-friendly fun: Gather the kids to help out; they’ll love pouring and layering the ingredients!
- Make ahead convenience: These cups store well in the fridge, making them great for meal prep or unexpected guests.
- Irresistible flavor: The combination of creamy peanut butter and smooth chocolate is simply divine!
Ingredients You’ll Need
You won’t believe how simple and wholesome these ingredients are! Gather up these pantry staples, and you’ll be on your way to making your own delicious Reese’s Cups.
For the Peanut Butter Filling
- 1 cup creamy peanut butter
- 1 cup powdered sugar
For the Chocolate Coating
- 2 cups milk chocolate chips
- 1 tablespoon coconut oil
Variations
This recipe is incredibly flexible, allowing you to get creative! Here are some fun ideas to customize your homemade Reese’s Cups:
- Switch up the nut butter: Use almond or cashew butter instead of peanut butter for a different flavor twist.
- Add crunch: Mix in some chopped nuts or crushed pretzels to the peanut butter filling for extra texture.
- Go dark: Use dark chocolate chips instead of milk chocolate for a rich, decadent taste.
- Flavor it up: Add a pinch of sea salt or vanilla extract to the filling for an extra flavor boost.
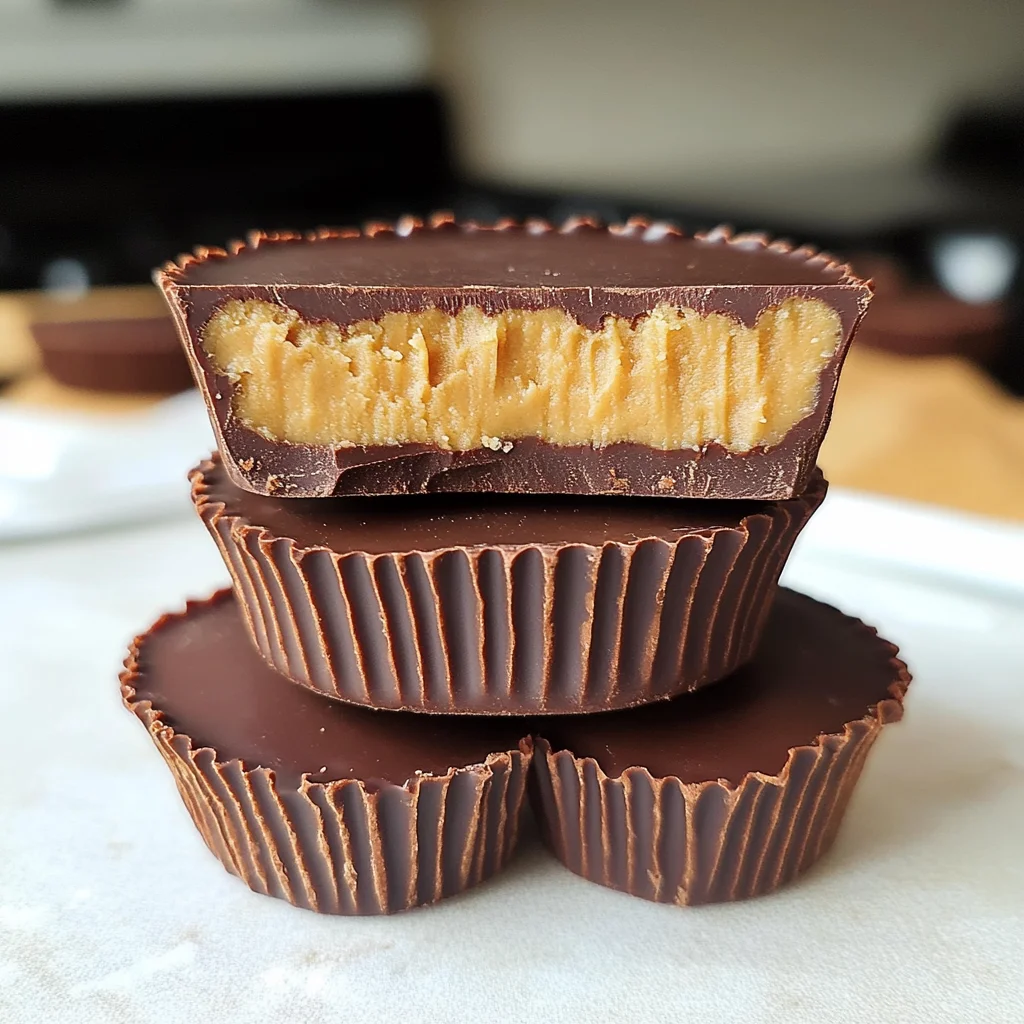
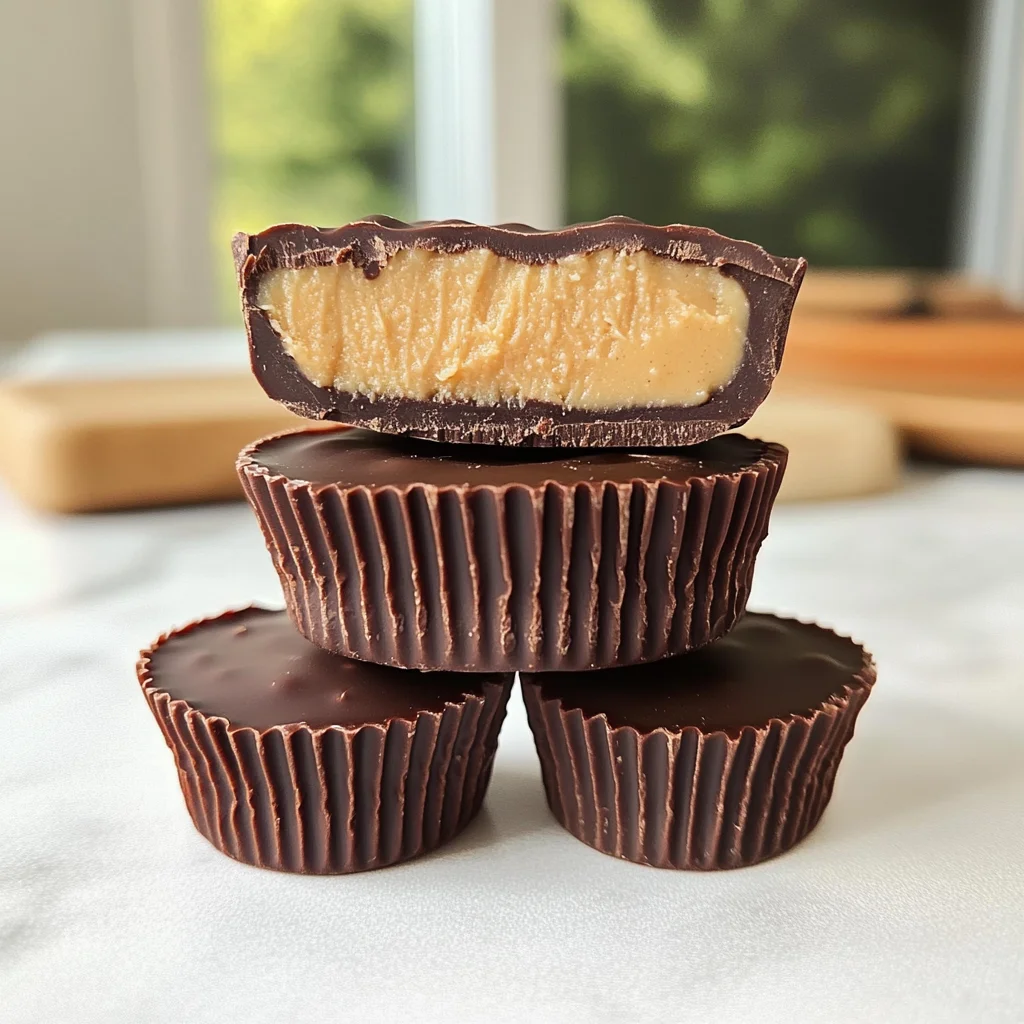
How to Make Tasty Homemade Reese’s Cups in 5 Simple Steps Today!
Step 1: Prepare the Peanut Butter Mixture
In a mixing bowl, combine creamy peanut butter and powdered sugar until smooth. This step is crucial because it creates that irresistible filling we all love. Mixing them together ensures that every bite has that sweet, nutty goodness!
Step 2: Melt the Chocolate
Melt milk chocolate chips and coconut oil together in a microwave-safe bowl or using a double boiler. Stirring frequently is important here; it helps achieve that silky-smooth texture we want for our chocolate coating.
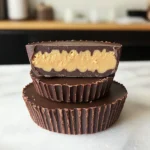
Step 3: Layer the Chocolate
Pour a layer of melted chocolate into the bottom of cupcake liners. This acts as the base of our cups. Make sure it’s even so each bite has that perfect balance of chocolate and peanut butter.
Step 4: Add Peanut Butter Filling
Spoon a generous amount of your peanut butter mixture on top of the chocolate layer. This is where all that yummy flavor comes from! Make sure not to overfill; we want just enough room for more chocolate on top.
Step 5: Top with More Chocolate
Cover everything with another layer of melted chocolate and refrigerate until set. This final step locks in all those delicious flavors while giving our cups their signature look. Once they are firm, they’re ready to enjoy!
And there you have it—your very own homemade Reese’s Cups! I hope you love making these as much as I do. Enjoy every sweet bite!
Pro Tips for Making Make Tasty Homemade Reese’s Cups in 5 Simple Steps Today!
Making your own Reese’s Cups can be a fun and rewarding experience, especially with these helpful tips to ensure they come out perfectly every time!
- Use room temperature ingredients – Allowing your peanut butter to come to room temperature will make it easier to mix with the powdered sugar, resulting in a smoother filling.
- Choose high-quality chocolate – Opting for good quality milk chocolate chips will enhance the flavor of your cups. The better the chocolate, the tastier your treats will be!
- Chill between layers – If you’re worried about the layers mixing together, pop the cups in the fridge for a few minutes after pouring each layer of chocolate. This helps create distinct layers and improves texture.
- Experiment with flavors – Feel free to get creative! Add a pinch of sea salt on top before refrigerating or mix in some crushed nuts for added crunch.
How to Serve Make Tasty Homemade Reese’s Cups in 5 Simple Steps Today!
Once your homemade Reese’s Cups are set and ready to go, serving them can be just as delightful as making them! Here are some ideas to make your presentation pop.
Garnishes
- Sea salt flakes – A sprinkle of flaky sea salt on top of each cup adds a delightful contrast to the sweetness.
- Cocoa powder dusting – Lightly dusting cocoa powder on top gives a nice chocolatey touch and enhances visual appeal.
Side Dishes
- Fresh fruit salad – A refreshing mix of seasonal fruits complements the richness of the peanut butter cups, balancing out the dessert beautifully.
- Vanilla ice cream – Creamy vanilla ice cream pairs perfectly with the chocolate and peanut butter flavors, offering a delightful contrast in textures.
- Coffee or tea – A warm cup of coffee or herbal tea makes for a comforting pairing that enhances the sweet treat while providing a cozy finish to your meal.
With these serving tips and ideas, you’re all set to enjoy your delicious homemade Reese’s Cups! Happy indulging!
Make Ahead and Storage
This homemade Reese’s Cups recipe is perfect for meal prep, allowing you to enjoy these delightful treats whenever the craving strikes. Here’s how to keep them fresh for later!
Storing Leftovers
- Keep your Reese’s Cups in an airtight container at room temperature for up to a week.
- For longer freshness, store them in the refrigerator where they can last up to two weeks.
Freezing
- Place the cups in a single layer on a baking sheet and freeze until solid.
- Once frozen, transfer them to a freezer-safe bag or container.
- They can be stored in the freezer for up to three months.
Reheating
- If you prefer your Reese’s Cups slightly warm, take them out of the fridge or freezer and let them sit at room temperature for a few minutes.
- Alternatively, microwave them on low power for about 10 seconds—just enough to soften without melting!
FAQs
Here are some common questions that might arise while making this delicious treat.
Can I make tasty homemade Reese’s Cups in 5 simple steps today?
Absolutely! This recipe simplifies the process into five easy steps, making it super quick and enjoyable to create your own version of these beloved treats.
How do I store my homemade Reese’s Cups?
You can store your homemade Reese’s Cups in an airtight container at room temperature for up to a week or refrigerate them for up to two weeks. If you want to keep them longer, freezing is also an option!
What if I don’t have coconut oil?
If you don’t have coconut oil on hand, you can substitute it with any neutral oil like vegetable oil or even use additional chocolate chips. Just ensure that it melts smoothly with the chocolate.
Can I use dark chocolate instead of milk chocolate?
Certainly! Using dark chocolate will give your homemade Reese’s Cups a richer flavor. Just remember that dark chocolate may have different melting properties, so keep an eye on it while melting.
Final Thoughts
These homemade Reese’s Cups are not just a delightful dessert; they’re a fun project that brings joy and nostalgia into your kitchen. I hope this recipe inspires you to whip up your own batch and share them with family and friends. Enjoy every creamy bite, and don’t forget to experiment with flavors or toppings that make this treat even more special! Happy cooking!
Make Tasty Homemade Reese’s Cups in 5 Simple Steps Today!
Looking for a delightful dessert that’s both simple and satisfying? Make tasty homemade Reese’s Cups in 5 simple steps today! These creamy, chocolate-covered peanut butter treats are perfect for any occasion, whether it’s a weeknight craving or a festive gathering. With just a few pantry staples, you can whip up these indulgent cups that combine the rich flavors of chocolate and peanut butter. Ideal for both kids and adults, this recipe allows you to enjoy a sweet moment together while creating delicious memories. Get ready to impress your family and friends with these homemade delights!
- Prep Time: 15 minutes
- Cook Time: 10 minutes
- Total Time: 25 minutes
- Yield: Makes approximately 12 cups 1x
- Category: Dessert
- Method: No-bake
- Cuisine: American
Ingredients
- 1 cup creamy peanut butter
- 1 cup powdered sugar
- 2 cups milk chocolate chips
- 1 tablespoon coconut oil
Instructions
- In a mixing bowl, combine creamy peanut butter and powdered sugar until smooth.
- Melt milk chocolate chips and coconut oil together in the microwave or double boiler until silky.
- Pour a layer of melted chocolate into cupcake liners to form the base.
- Spoon the peanut butter mixture on top of the chocolate layer, leaving room for more chocolate.
- Cover with another layer of melted chocolate and refrigerate until set.
Nutrition
- Serving Size: 1 cup (32g)
- Calories: 140
- Sugar: 10g
- Sodium: 50mg
- Fat: 9g
- Saturated Fat: 4g
- Unsaturated Fat: 5g
- Trans Fat: 0g
- Carbohydrates: 13g
- Fiber: 1g
- Protein: 3g
- Cholesterol: 0mg