Red White and Blue Bark
If you’re looking for a delightful treat that’s as festive as it is delicious, you’ve come to the right place! This Red White and Blue Bark is a fun, no-bake recipe that’s perfect for celebrating special occasions like Memorial Day or Independence Day. The bright colors and sweet flavors make it an instant favorite for both kids and adults alike! Plus, it’s so easy to whip up that even your little ones can join in on the fun.
This recipe has become a cherished family tradition in my house, bringing smiles and joy every time we make it together. It’s not just about the taste—it’s about creating memories with those we love. So grab your ingredients and let’s get started on this fun treat!
Why You’ll Love This Recipe
- Quick and Easy: This recipe takes just 10 minutes to prepare, making it perfect for busy days or last-minute gatherings.
- Kid-Friendly Fun: With colorful candy melts and toppings, little hands will enjoy helping out in the kitchen!
- Customizable: You can easily swap out toppings or colors to suit any celebration or personal preference.
- No-Bake Delight: No ovens or complicated techniques are needed—just melt, mix, and chill!
- Perfect for Sharing: Cut into pieces and pack them up for picnics, barbecues, or school treats.
Ingredients You’ll Need
Let’s gather some simple and wholesome ingredients to make our Red White and Blue Bark! You’ll be amazed at how easy it is to find everything you need to create this colorful treat.
For the Bark
- 16 oz bright white candy melts (or equal amounts of white chocolate)
- 6 oz royal blue candy melts
- 6 oz red candy melts
For the Toppings
- Handful of Oreo cookies (crushed into bite-sized pieces)
- Red, white, and blue M&Ms
- Red, white, and blue star sprinkles
- Red, white, and blue jimmies
Variations
One of the best things about this Red White and Blue Bark is how flexible it is! You can mix things up based on what you have at home or your personal tastes. Here are some fun ideas:
- Change the Colors: Swap out the red and blue candy melts for your favorite colors to match any occasion.
- Add Different Toppings: Use crushed pretzels, nuts, or different types of candies for a unique twist.
- Make It Healthier: Consider using dark chocolate instead of candy melts for a richer flavor.
- Create a Layered Effect: Pour layers of melted chocolate instead of swirling them together for a different look.
How to Make Red White and Blue Bark
Step 1: Prepare the Oreo Cookies
Start by breaking down those Oreo cookies! Place them in a resealable plastic bag, seal it tightly, and gently hit them with a rolling pin until they are in bite-sized pieces. This adds a nice crunch to your bark!
Step 2: Set Up Your Pan
Line an 11×15 jelly roll pan (or regular 9×13 pan) with aluminum foil. A light spray with cooking spray will help later when you remove the bark. Setting this up properly ensures an easy release once it’s hardened.
Step 3: Melt the White Candy Melts
In a small saucepan filled with about an inch of water (heated on LOW), create a double boiler by placing a large glass bowl over it. Pour in your bright white candy melts. Stir gently with a rubber spatula until they are completely melted and smooth. This method prevents overheating!
Step 4: Microwave the Colored Candy Melts
Pour red candy melts into one microwave-safe bowl and blue in another. Microwave each one at 70% power in short bursts (30-45 seconds), stirring in between until they’re mostly melted—then let residual heat do its magic!
Step 5: Assemble Your Bark
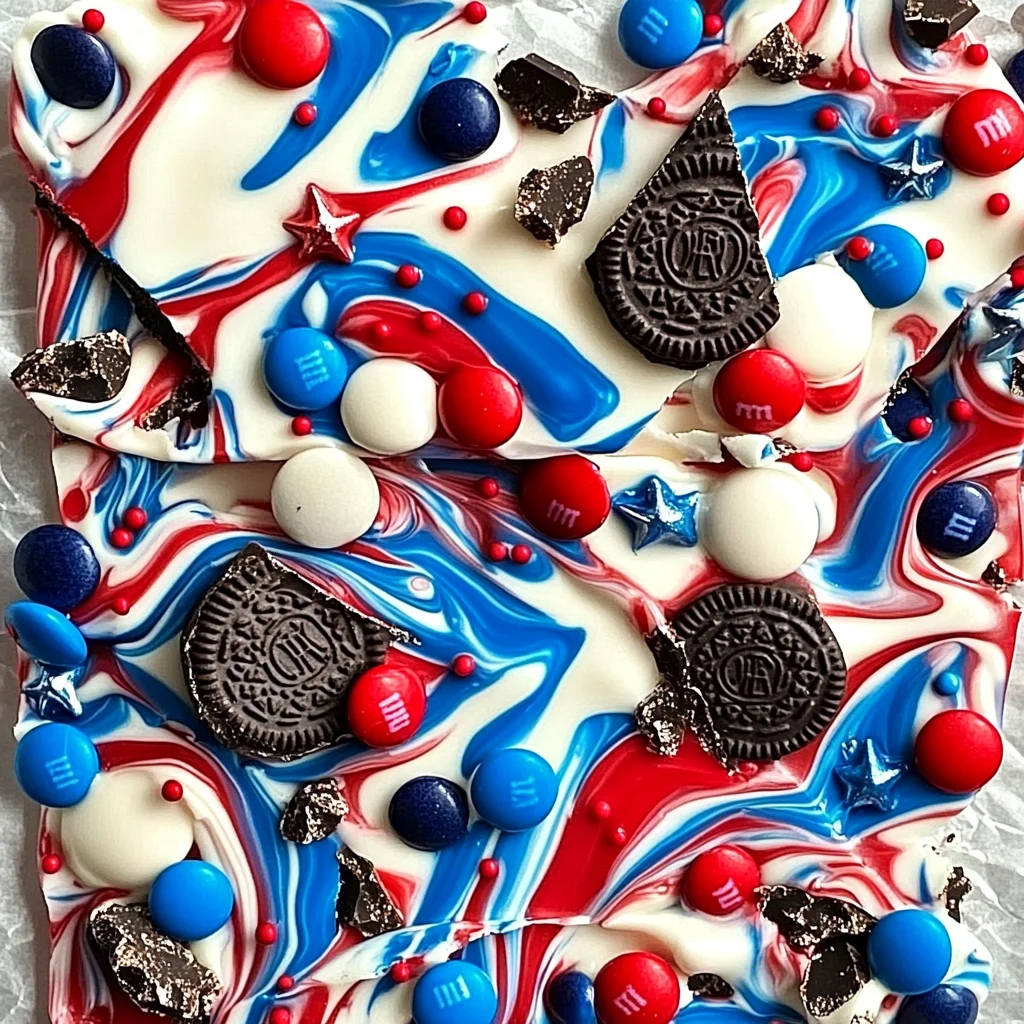
Once your white chocolate is melted, pour it into your prepared jelly roll pan. Use your spatula to spread it evenly across the bottom. Then drizzle alternating lines of melted red and blue candy melts over top.
Step 6: Swirl It Together
Grab a small wooden skewer or butter knife and swirl through the colors in a figure-eight motion—this creates beautiful marbled patterns! Don’t stress too much about making it perfect; it’s all about having fun.
Step 7: Add Your Toppings
Now comes the best part! Sprinkle your swirled mixture with crushed Oreo pieces, M&Ms, star sprinkles, and jimmies. The more toppings, the merrier!
Step 8: Chill Until Hard
Pop your pan into the refrigerator for about 1-2 hours until it’s fully hardened. Patience is key here; waiting will pay off!
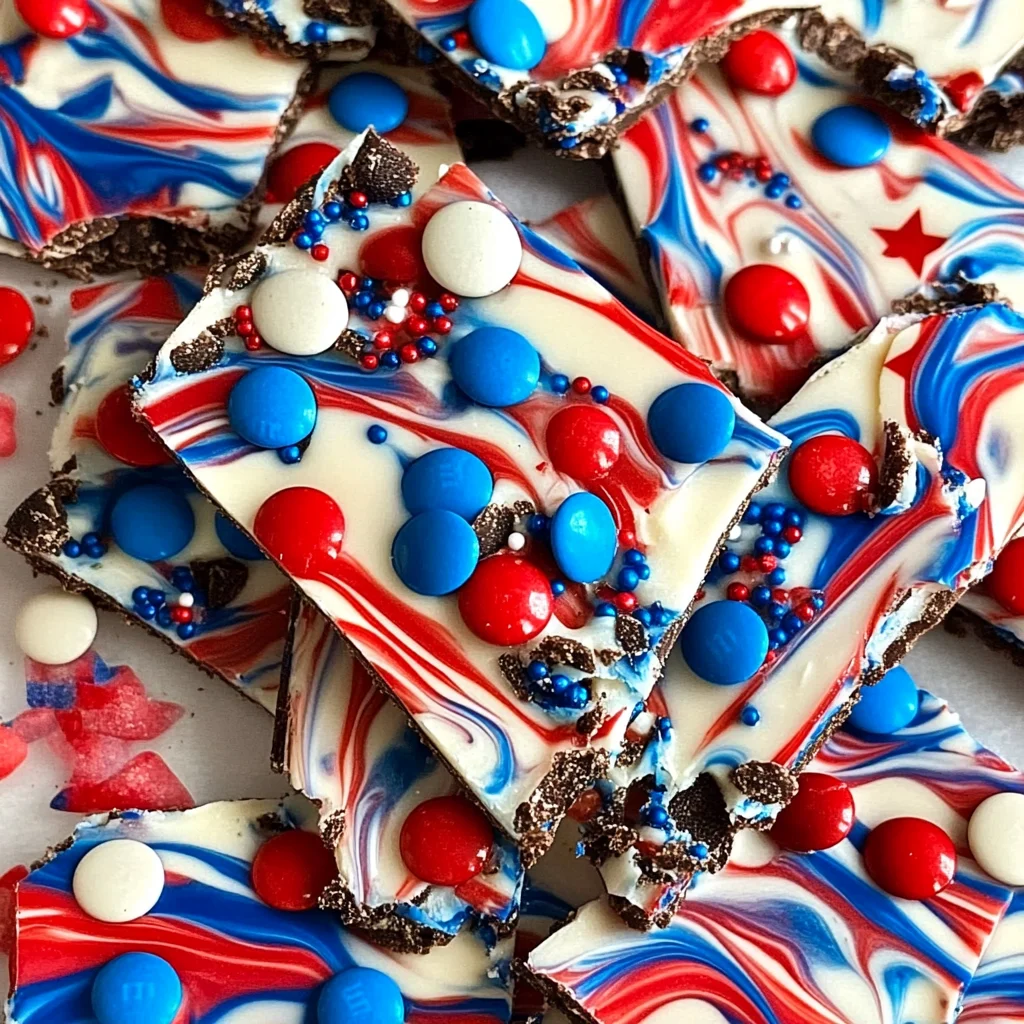
Step 9: Break It Apart
Once set, lift the edges of the aluminum foil to remove the bark from the pan. Break into pieces—this can be therapeutic!
Step 10: Serve & Enjoy!
Keep your Red White and Blue Bark refrigerated until you’re ready to share because it’s sure to disappear quickly at any gathering! Enjoy every colorful bite with family or friends.
Now that you’ve got all these steps laid out clearly, I’m sure you’ll create something wonderful that everyone will adore! Happy baking!
Pro Tips for Making Red White and Blue Bark
Creating the perfect Red White and Blue Bark is a breeze with these helpful tips!
-
Use Quality Candy Melts: Opt for high-quality candy melts for vibrant colors and a smooth finish. This ensures that your bark not only looks great but also tastes delicious.
-
Control Your Heat: When melting candy, always use low heat or microwave in short intervals. This prevents the chocolate from burning, which can ruin the texture.
-
Don’t Overmix Your Swirls: When swirling the red and blue candy melts into the white, be gentle. Overmixing can lead to a muddy color instead of beautiful swirls.
-
Add Texture Wisely: Incorporating crunchy elements like crushed Oreo cookies or M&M’s adds delightful texture. Be sure to evenly distribute them for every bite to be satisfying.
-
Keep it Cool: Refrigerate your bark until fully hardened. This helps in achieving clean breaks when you cut or break the bark into pieces.
How to Serve Red White and Blue Bark
Serving your Red White and Blue Bark can be just as fun as making it! Here are some creative ideas that will impress your friends and family during celebrations.
Garnishes
- Fresh Berries: A handful of strawberries or blueberries on top adds freshness and enhances the patriotic theme.
- Whipped Coconut Cream: A dollop of this dairy-free cream gives a lovely contrast in flavor while adding a touch of elegance.
- Mint Leaves: Sprinkling a few mint leaves around adds a pop of color and a refreshing aroma that complements the sweetness.
Side Dishes
- Fruit Salad: A mix of seasonal fruits can provide a refreshing balance to the sweetness of the bark. Consider using strawberries, blueberries, and bananas for a festive touch.
- Veggie Platter with Hummus: Crisp vegetables like carrots, cucumbers, and bell peppers served with hummus offer a crunchy contrast that’s both healthy and colorful.
- Patriotic Smoothies: Blend together strawberries, bananas, and blueberries for layered smoothies that align perfectly with your festive theme.
- Popcorn Mix: Whip up some popcorn mixed with red, white, and blue candies or sprinkles. It’s an easy-to-eat snack that keeps the party atmosphere lively.
With these serving suggestions in mind, you’re set for a delightful gathering filled with fun, flavor, and festive spirit! Enjoy creating your Red White and Blue Bark!
Make Ahead and Storage
This Red White and Blue Bark is perfect for meal prep, allowing you to whip up a festive treat in advance. Whether you’re preparing for a holiday celebration or just want a sweet snack on hand, this bark stores beautifully!
Storing Leftovers
- Store any leftover bark in an airtight container.
- Keep the container in the refrigerator to maintain freshness.
- Enjoy within one week for optimal taste and texture.
Freezing
- Cut the bark into pieces before freezing for easy access later.
- Place pieces in a single layer on a baking sheet and freeze until solid.
- Transfer frozen pieces to an airtight freezer-safe bag or container.
- Enjoy within three months for the best flavor.
Reheating
- Since this recipe is no-bake, reheating isn’t necessary.
- If the bark becomes too soft due to room temperature, simply place it back in the refrigerator for a few minutes to firm up.
FAQs
Here are some common questions about making Red White and Blue Bark.
Can I use chocolate chips instead of candy melts for Red White and Blue Bark?
Yes! While candy melts give a smooth finish and vibrant colors, you can use white chocolate chips instead. Just be sure to melt them carefully to avoid burning.
How do I make my Red White and Blue Bark look more festive?
To enhance the appearance of your Red White and Blue Bark, consider adding more sprinkles or using edible glitter. You could also drizzle additional melted candy over the top for extra flair!
How long does Red White and Blue Bark last?
Properly stored in an airtight container, your Red White and Blue Bark will last up to a week in the refrigerator. If frozen, it can be enjoyed within three months!
Can I customize the toppings on my Red White and Blue Bark?
Absolutely! Feel free to get creative with your toppings—add nuts, dried fruits, or even different types of candies to suit your taste!
Final Thoughts
I hope you enjoy making this delightful Red White and Blue Bark as much as I do! It’s not only simple and fun but also brings a splash of color and joy to any occasion. Whether you’re celebrating with family or just treating yourself, this recipe is sure to bring smiles all around. Happy baking, and don’t forget to share your creations!
Red White and Blue Bark
If you’re in search of a festive and colorful treat, look no further than this Red White and Blue Bark! This no-bake dessert is perfect for celebrations like Memorial Day or Independence Day. With bright candy melts and delightful toppings, this recipe is not just fun to make but also creates cherished memories with loved ones. It’s quick to prepare—taking only about 10 minutes—and is a fantastic activity for kids in the kitchen. Customize it easily based on your preferences or available ingredients, making it versatile for any occasion. Gather your supplies and get ready for a sweet treat that everyone will adore!
- Prep Time: 10 minutes
- Cook Time: 0 minutes
- Total Time: 10 minutes
- Yield: Approximately 12 servings 1x
- Category: Dessert
- Method: No-Bake
- Cuisine: American
Ingredients
- 16 oz bright white candy melts
- 6 oz royal blue candy melts
- 6 oz red candy melts
- Handful of crushed Oreo cookies
- Red, white, and blue M&Ms
- Red, white, and blue star sprinkles
Instructions
- Prepare Oreo cookies by crushing them into bite-sized pieces.
- Line an 11×15" jelly roll pan with aluminum foil and lightly spray with cooking spray.
- Melt the white candy melts using a double boiler method until smooth.
- Microwave red and blue candy melts separately until mostly melted; stir until smooth.
- Pour melted white chocolate into the pan, then drizzle red and blue candy melts on top.
- Swirl colors gently with a skewer or knife to create marbled patterns.
- Sprinkle crushed Oreos, M&Ms, star sprinkles, and jimmies over the top.
- Chill in the refrigerator for 1-2 hours until set.
- Remove from the pan using foil edges, then break into pieces.
Nutrition
- Serving Size: 1 piece (40g)
- Calories: 190
- Sugar: 22g
- Sodium: 20mg
- Fat: 8g
- Saturated Fat: 5g
- Unsaturated Fat: 3g
- Trans Fat: 0g
- Carbohydrates: 29g
- Fiber: 0g
- Protein: 1g
- Cholesterol: 0mg